In part 1 we were able to get a CentOS 7 VM up and running with a GUI. In part 2 we will setup a shared drive and install the development tools: Git, OpenJDK, Maven and Docker.
Setup a shared drive
If you want a folder that you can share files between the host OS and VM, then a shared drive can be created.
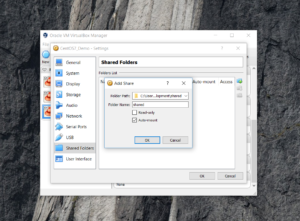
Go to the VM settings and select ‘Shared Folders’. Choose a folder path and a name (e.g. shared). Note: this name will be used later. Select the auto mount checkbox to avoid having to do this manually each time.

Boot up the VM and go to Devices -> Insert Guest Additions CD Image…
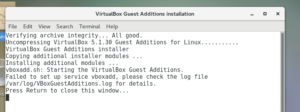
This will attempt to start the VirtualBox Guest Additions.

If any errors occur then check the logs in /var/log/vboxadd-install.log.
There might be issues where it cannot find certain packages. Take note of the names and install the relevant packages. There was a post on the CentOS forum for this issue in 6.2.

In the end, the following command resolved the issues:
yum install -y gcc kernel-headers kernel-devel
reboot
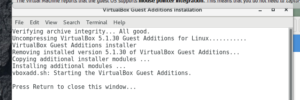
Retry the Insert Guest Additions menu options and it should load up correctly without failures.

Open up a terminal and execute the following mount command:
sudo mount -t vboxsf {Your_Folder_Name} {Directory_VirtualBox_Shared_Folder_will_be_mounted}
A few steps before this, ‘shared’ was assigned as the folder name. For this example, if a directory is created in the VM from root with the name ‘shareddir’ then the command would simply be
sudo mount -t vboxsf shared ~/shareddir/
Install Git
From the terminal type:
sudo yum install git

# verify the version, the output will be similar to: git version 1.8.3.1
git --version
Install OpenJDK
For simplicity, OpenJDK 8 will be used. Full details can be found on server-world: Install OpenJDK 8
Command summary:
[root@localhost ~]# yum -y install java-1.8.0-openjdk java-1.8.0-openjdk-devel
Loaded plugins: fastestmirror, langpacks
Loading mirror speeds from cached hostfile
Package 1:java-1.8.0-openjdk-1.8.0.151-1.b12.el7_4.x86_64 already installed and latest version
Resolving Dependencies
--> Running transaction check
--> Package java-1.8.0-openjdk-devel.x86_64 1:1.8.0.151-1.b12.el7_4 will be installed
--> Finished Dependency Resolution

Dependencies Resolved
=======================================================
 Package                    Arch     Version                    Repository                   Size
=======================================================
Installing:
 java-1.8.0-openjdk-devel   x86_64   1:1.8.0.151-1.b12.el7_4    updates   9.7 M

Transaction Summary
=======================================================
Install  1 Package

Total download size: 9.7 M
Installed size: 40 M
Downloading packages:
java-1.8.0-openjdk-devel-1.8.0.151-1.b12.el7_4.x86_64.rpm  | 9.7 MB
Running transaction check
Running transaction test
Transaction test succeeded
Running transaction
  Installing : 1:java-1.8.0-openjdk-devel-1.8.0.151-1.b12.el7_4.x86_64      1/1
  Verifying  : 1:java-1.8.0-openjdk-devel-1.8.0.151-1.b12.el7_4.x86_64      1/1

Installed:
  java-1.8.0-openjdk-devel.x86_64 1:1.8.0.151-1.b12.el7_4

Complete!

# --------------------------------------------
[root@localhost ~]# dirname $(readlink $(readlink $(which java)))
/usr/lib/jvm/java-1.8.0-openjdk-1.8.0.151-1.b12.el7_4.x86_64/jre/bin
[root@localhost ~]# vi /etc/profile
# java config start
export JAVA_HOME=/usr/lib/jvm/java-1.8.0-openjdk-1.8.0.151-1.b12.el7_4.x86_64
export PATH=$PATH:$JAVA_HOME/bin
export CLASSPATH=.:$JAVA_HOME/jre/lib:$JAVA_HOME/lib:$JAVA_HOME/lib/tools.jar
# java config end
[root@localhost ~]# source /etc/profile

# --------------------------------------------
# verify
[admin@localhost ~]$ java -version
openjdk version "1.8.0_151"
OpenJDK Runtime Environment (build 1.8.0_151-b12)
OpenJDK 64-Bit Server VM (build 25.151-b12, mixed mode)
Install Maven
No need to reinvent the wheel, the installation details can be found on tecadmin: Install Apache Maven on CentOS
Note: Before starting the steps in the tutorial check which versions are available in case there are newer versions: maven versions
Command summary:
[admin@localhost opt]$ sudo wget http://www-eu.apache.org/dist/maven/maven-3/3.5.2/binaries/apache-maven-3.5.2-bin.tar.gz
[sudo] password for admin:
...
‘apache-maven-3.5.2-bin.tar.gz’ saved [8738691/8738691]
[admin@localhost opt]$ ls
apache-maven-3.5.2-bin.tar.gz

# --------------------------------------------
[admin@localhost opt]$ sudo tar xzf apache-maven-3.5.2-bin.tar.gz
[admin@localhost opt]$ sudo ln -s apache-maven-3.5.2 maven
[admin@localhost opt]$ sudo vi /etc/profile.d/maven.sh
# maven config start
export M2_HOME=/opt/maven
export PATH=${M2_HOME}/bin:${PATH}
# maven config end
[admin@localhost opt]$ source /etc/profile.d/maven.sh

# --------------------------------------------
# in addition to the maven version you will notice the java version from the previous setup
[admin@localhost opt]$ mvn -version
Apache Maven 3.5.2 (138edd61fd100ec658bfa2d307c43b76940a5d7d; 2017-10-18T09:58:13+02:00)
Maven home: /opt/maven
Java version: 1.8.0_151, vendor: Oracle Corporation
Java home: /usr/lib/jvm/java-1.8.0-openjdk-1.8.0.151-1.b12.el7_4.x86_64/jre
Default locale: en_US, platform encoding: UTF-8
OS name: "linux", version: "3.10.0-693.5.2.el7.x86_64", arch: "amd64", family: "unix"
Install Docker
Besides the official Docker documentation, read a step by step article for installing Docker on CentOS 7.
Command summary – install:
[root@localhost ~]# wget https://download.docker.com/linux/centos/docker-ce.repo -O /etc/yum.repos.d/docker-ce.repo
...
‘/etc/yum.repos.d/docker-ce.repo’ saved [1802/1802]

[root@localhost ~]# yum -y install docker-ce
Loaded plugins: fastestmirror, langpacks
docker-ce-stable                                         | 2.9 kB     00:00
docker-ce-stable/x86_64/primary_db                         | 9.3 kB   00:01
Loading mirror speeds from cached hostfile
Resolving Dependencies
--> Running transaction check
---> Package docker-ce.x86_64 0:17.09.0.ce-1.el7.centos will be installed
--> Processing Dependency: container-selinux >= 2.9 for package: docker-ce-17.09.0.ce-1.el7.centos.x86_64
--> Running transaction check
---> Package container-selinux.noarch 2:2.28-1.git85ce147.el7 will be installed
--> Finished Dependency Resolution

Dependencies Resolved
================================================================================
 Package            Arch    Version                     Repository         Size
================================================================================
Installing:
 docker-ce          x86_64  17.09.0.ce-1.el7.centos     docker-ce-stable   21 M
Installing for dependencies:
 container-selinux  noarch  2:2.28-1.git85ce147.el7     extras             29 k

Transaction Summary
================================================================================
Install  1 Package (+1 Dependent package)

Total download size: 21 M
Installed size: 76 M
...

Installed:
  docker-ce.x86_64 0:17.09.0.ce-1.el7.centos

Dependency Installed:
  container-selinux.noarch 2:2.28-1.git85ce147.el7

Complete!
# --------------------------------------------
# verify
[root@localhost ~]# docker version

# start
[admin@localhost ~]$ systemctl start docker
Privileges for docker without sudo:
[admin@localhost ~]$ docker ps
Got permission denied while trying to connect to the Docker daemon socket at unix:///var/run/docker.sock: Get http://%2Fvar%2Frun%2Fdocker.sock/v1.32/containers/json: dial unix /var/run/docker.sock: connect: permission denied
[admin@localhost ~]$ sudo docker ps
CONTAINER ID        IMAGE               COMMAND             CREATED             STATUS              PORTS               NAMES

[admin@localhost ~]$ sudo groupadd docker
groupadd: group 'docker' already exists
[admin@localhost ~]$ sudo gpasswd -a $USER docker
[admin@localhost ~]$ newgrp docker

[admin@localhost ~]$ docker ps
CONTAINER ID        IMAGE               COMMAND             CREATED             STATUS              PORTS               NAMES
Verify installation using example from the Docker website:
[admin@localhost ~]$ docker run hello-world
Unable to find image 'hello-world:latest' locally
latest: Pulling from library/hello-world
5b0f327be733: Pull complete
Digest: sha256:07d5f7800dfe37b8c2196c7b1c524c33808ce2e0f74e7aa00e603295ca9a0972
Status: Downloaded newer image for hello-world:latest

Hello from Docker!
This message shows that your installation appears to be working correctly.

To generate this message, Docker took the following steps:
 1. The Docker client contacted the Docker daemon.
 2. The Docker daemon pulled the "hello-world" image from the Docker Hub.
 3. The Docker daemon created a new container from that image which runs the
    executable that produces the output you are currently reading.
 4. The Docker daemon streamed that output to the Docker client, which sent it
    to your terminal.

To try something more ambitious, you can run an Ubuntu container with:
 $ docker run -it ubuntu bash

Share images, automate workflows, and more with a free Docker ID:
 https://cloud.docker.com/

For more examples and ideas, visit:
 https://docs.docker.com/engine/userguide/
That concludes the set up of a CentOS 7 VM for Dev 🙂
